Patches are a fun detail to add to any look or to brighten up a favourite outfit. They’re also great for hiding stains and holes in your old clothes.
We’ll show you how to iron on patches at home in no time. After that, your patched outfits will have a whole new aspect to them, and your patches will remain secure.
How to Iron on a Patch, Step by Step Guide
Steps to iron on patches:
- Prepare the iron: Ironing instructions can be found on the clothes label. Steam should not be used.
- Place the patch: Place the patch on a clean piece of clothing.
- Use a pressing cloth: Use a pressing cloth to keep the patch safe. For 30 to 45 seconds, push forcefully.
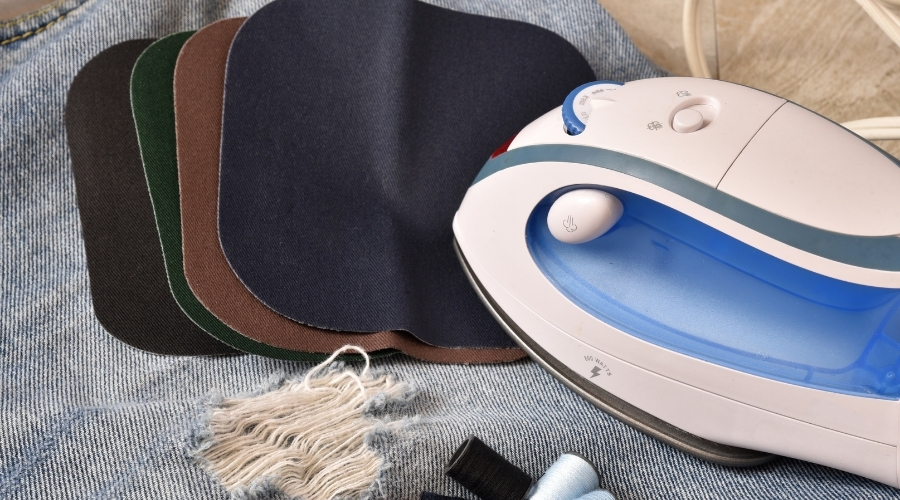
What You Will Require
You’ll need a few things to iron on a patch.
- A patch that can be ironed on.
- Board for ironing.
- A piece of garment that the patch can be ironed on.
- Cloth for pressing.
Following is an easy step by step guide to iron on a patch:
Prepare the iron
The first thing you should do is have your iron ready. It’s a good idea to utilize an ironing board here to avoid damaging any of your home’s surfaces. Use the maximum setting your clothes can handle when preparing your iron. This information can be found on the clothes label, be sure to check it beforehand. Polyester, as a general rule, requires less heat. Cotton can withstand a lot of heat. Always look at the label to see what it says. Ironing on silk patches or other sensitive fabrics is not recommended. The ideal fabrics to iron patches on are Denim and cotton. Turn off the steam setting if you’re using a steam iron instead of a standard iron. Make sure the iron is completely dry and no water is present.
Place the patch
Decide where you want the iron to be placed before you bring it to the patch. For the best outcome, the patch should be flat and uneven. After that, it’s entirely up to you where you want to put it.
We do, however, offer some suggestions for the ideal places to apply patches on specific garments. For example, your patch could be placed on the chest, breast pocket, or sleeve of a shirt. If the patch is small enough, you may even wear it on your collar. A sleeve or chest pocket is usually the finest place to iron your patch onto a jacket. However, you are free to place your patch wherever you choose. If you wish to cover an entire garment in patches, make sure you allow room for more.
Use a pressing cloth
Get out your pressing cloth now that you’re almost ready to start. This will keep the patch safe. Cover the patch with the fabric. When doing this, be careful not to move the patch. For around 30 to 45 seconds, press down on the cloth with your heated iron. Push firmly and don’t budge. You don’t want to remove the patch from the spot it’s in.
Flip and repeat
Allow a few minutes for the patch to cool before turning the garment inside out and pressing it flat on the ironing board. Next, put the pressing cloth on the opposite side of the patch and repeat step 3. This assures the safety of your patch. Allow it to cool completely before putting it on.
Q & A
Q: Can you just iron on a patch?
Yes, you can just iron on a patch. First, turn the iron to the highest temperature and iron the side of the garment to warm it up, then position the patch where you want and iron it on over a cloth or towel (to avoid burning the patch).
Patches that have been ironed on often last for 25 washes.
Q: How long do you hold an iron on a patch?
Press the hot iron over the patched area and hold it in place for 20 seconds. Then, firmly press down with a steady grip. To prevent the patch from moving on the fabric, don’t shift when applying pressure. Finally, remove the iron from the patch and set it aside to cool for a minute or more.
Q: How do you iron on a heat transfer patch?
Following are instructions to iron on a heat transfer patch:
- On the temperature setting, put the iron to “cotton” or “high heat.”
- Spread the cloth out flat (on an ironing board).
- Preheat the clothing on which the patch will be sewn. Placing a cheap cloth, sheet, or pillowcase between the iron and the clothing will help to protect it. Then, for 10 seconds, push the heated iron firmly on top of the cloth.
4. Apply the patch on the preheated area. To avoid burning the embroidery thread, place a cloth, sheet, or pillowcase on top of the embroidered section of the patch. For 15-20 seconds, press firmly on the iron. - If possible, repeat this process on the garment’s opposite side. To avoid burning the garment, be sure to use a thin cloth, sheet, or pillowcase.
- This is crucial: Your glue will be hot and liquified when you apply it, but it will cool quickly and stiffen. Before the adhesive solidifies, make sure the patch does not move around on the clothing. The bond will be less secure if it travels about.
- Place your clothing on a flat surface and allow it to cool to room temperature.
Related topics
How to clean an iron (Easy guide)
The following are two commonly used methods for cleaning an iron:
- Scrubbers and sponges
Scrub the iron’s surface with soap and warm water using a sponge or scrubber. When you’re done, clean it with a damp towel and allow it to dry fully before using it.
- Laundry detergent
Adding a few drops of liquid dish detergent to some water is one of the simplest methods to clean a flat iron. First, wipe away any residue on the iron’s base using a soft rag or towel soaked in the solution.
Conclusion
Have fun experimenting with all types of patches now that you know how to iron them on. Customize your outfits and add a whole new spark to them. Do keep in mind, though, whenever you’re tempted to use paper clips or other harsh things to clean an iron, please avoid! You run a risk of scratching your iron’s soleplates and steam holes if you do so. So just stick to the guide, and your iron will look great, and so will the patches.